
Create reports
Reports is the feature that enables you to export your data in Excel and PDF or other custom formats.
Prerequisites
To create your first report, you will need at least one source on which you have already uploaded data in Opinum.
In Opinum Data Hub, go to the Reports page and click on Actions, then Create Report. The report creation pop-up opens. You can now fill all the fields as follows.
General information
Name
Choose a name for your report. A unique ID will be automatically created.
Schedule
The report can be generated on demand each type you need it or generated on a scheduled base (e.g : each monday at 8:00 a.m, each 1st day of the month, every day-of-week from Monday to Friday at noon)
- To generate the report on-demand, select On-demand in the Schedule type field.
- To schedule the report, select Scheduled in the Schedule type field.
Then choose the schedule. By default the simple schedule is selected, to easily set-up the schedule in the interface.
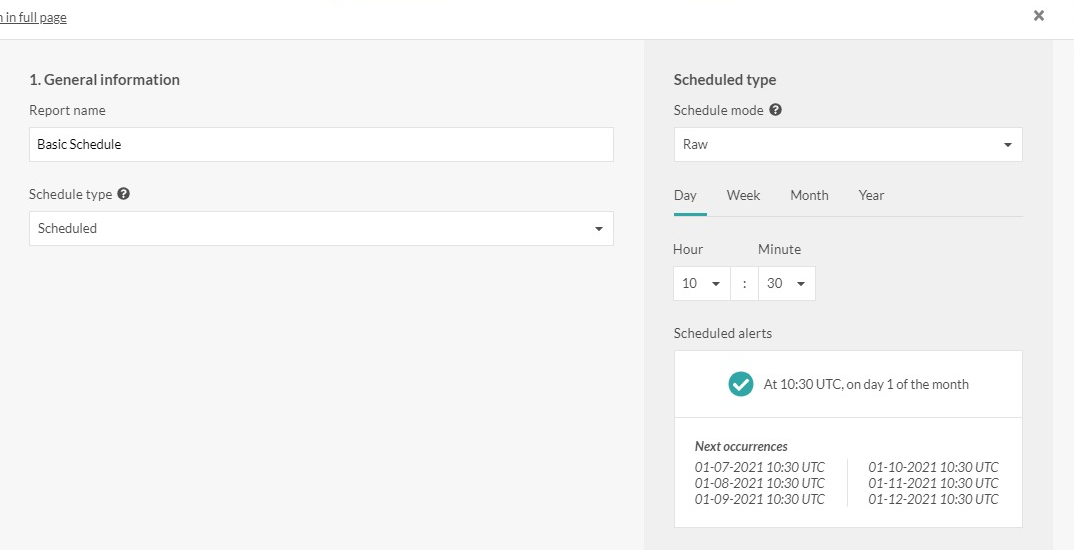
Click on the frequency (day, week, month or year), and configure the schedule. The next occurrences are displayed in the Scheduled reports box to easily check if the configuration is right.
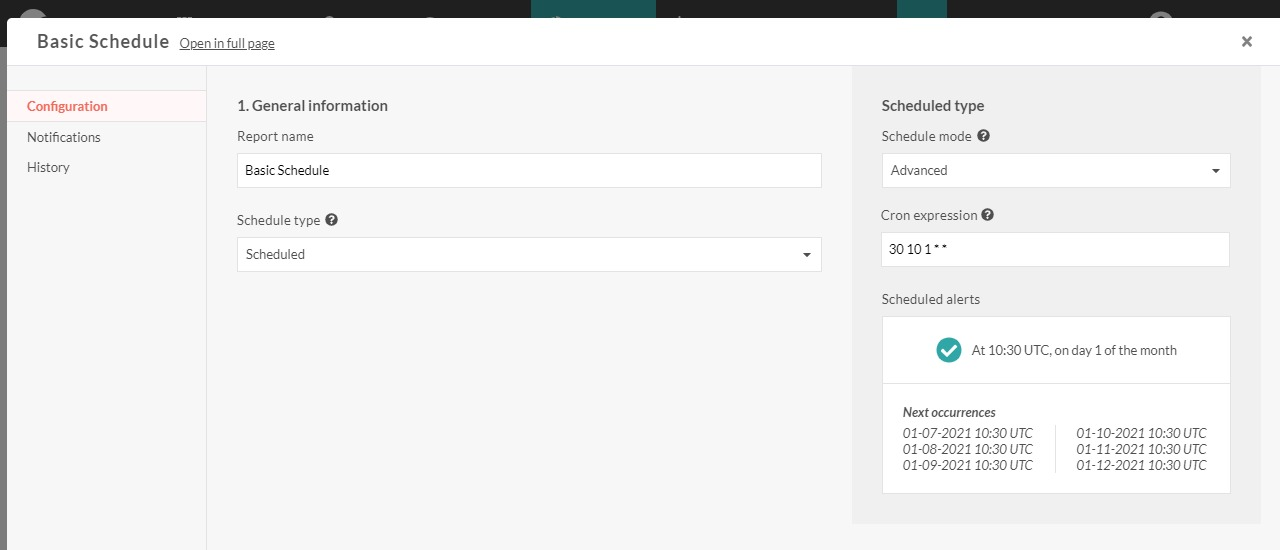
If you need a more customized schedule, then select Advanced in the Schedule mode drop-down.
A free expression field appears. Fill it using cron syntax.
Tip
Learn more about cron.
Data sources
Here you can select the data to export in your report. There is two ways of selecting the data:
In both cases the following fields should be filled:
- Datasource : enter the name of the Excel sheet where the data will be displayed
- Site : select the site where your source is located
- Source: select the source or view you want to make the report on
- Variable: select the variable on which the data you wan to export are stored
Note
If a default variable is defined on the source the fields variable and unit will be pre-filled with it. Learn how to define a default variable
Granularity: you can choose to export raw data (as it is stored in our database) or to aggregate it. Aggregation helps to reduce the report file size by exporting only one data point per period chosen.
Aggregation: if you select a granularity other than raw, this field will let you choose how the data is aggregated within the selected period
AVG: average value of the data points
Count: count the number of data points
MAX: maximum value of data points out of all values of all data points
MIN: minimum value of data points out of all values of all data points
STDEV: standard deviation
SUM: sum of all values of all data points
VAR: variance
Period: choose the period to export. You can choose a fixed or a sliding period.
Note
The last complete period plus the time till now will be exported. e.g.: on September 1st 2018, if you export 1 year of data, you will get the data from January 1st 2017 till August 31th 2018 included.
- Unit: select the unit in which you want to export the data
Metadata
You can also add metadata linked to the sites and sources selected in the previous step. All these options are optional.
- Sites: site details, including the forms
- Sources: sources details, including the forms
- Alerts: include an history of every alert related to data sources selected
- Events: include an history of every event related to data sources selected
- Invoices: include the invoices linked to the sites selected
- Schedules: include the schedules configured for the sites selected
Notifications
Here, you can configure how the report will be sent. Choose who will receive the report and how by clicking on the Add another notification button. The Notifications panel opens, select the way you want the report to be sent and click on the Save button.
You can also choose to apply a template on you report by notifications.
Tip
Learn more about how to send and receive reports
Click on the Save button to create your report. You will now find it in the reports page.
Tip
Learn how to manage reports