
Introduction
The goal of this document is to show how you can integrate Opinum and Azure IoT Hub together in order to have your data on one side and the device Management on the other side.
Prerequisites
Before you start, we strongly recommend that you have a good understanding of the following resources:
Opinum Webhooks
Opinum Webhooks is a feature that allows you to send a notification to an external system. Those notifications are made through HTTP requests.
You can read more on Opinum Webhooks in the documentation
Opinum Security Flow
The Opinum Security Flow (Identity Server Token Flow) is the process that describes how you acquire security tokens from Opinum Identity Server and how you can refresh those tokens.
It is not completely mandatory to master this topic in the context of the integration with Azure IoT Hub as we offer a library that does all this for you but it is an important concept to keep in mind during your developments.
Opinum Standard Push Format
This format is a straight forward way to send data to Opinum Data Hub in a JSON Format. It allows for you to choose how opinum will map you data to the sources and variables. More info in the documentation
Azure IoT Hub
Connect, monitor, and manage billions of IoT assets—Use Azure IoT Hub to securely connect, monitor, and manage billions of devices to develop Internet of Things (IoT) applications. IoT Hub is an open and flexible cloud platform as a service that supports open-source SDKs and multiple protocols. Azure IoT Hub Documentation
Azure Functions
Take advantage of serverless compute with Functions Easily build the apps you need using simple, serverless functions that scale to meet demand. Use the programming language of your choice, and don’t worry about servers or infrastructure. Azure Functions Documentation
Azure Event Hubs
Cloud-scale telemetry ingestion from websites, apps, and any streams of data Azure Event Hub Documentation
Use cases
In this section we are going to show 2 different approaches to source / device ownership.
This section also includes a common part for the 2 use cases being the data ingestion in Opinum Data Hub.
Use Case 1: Sources created from Opinum Data Hub
This use case is based on the assumption that Azure IoT Hub should "replicate" Opinum Data Hub's Source configuration. In other words, when a new Source is created in Opinum Data Hub, a device gets automatically created in Azure IoT Hub.
For this step you'll need the following:
- An Azure IoT Hub Instance
- An Azure Function App
- An Opinum Account
1. Setup a simple Azure Function
We are going to create a simple function that will be triggered by an HTTP call.
The following code is enough to get started:
[FunctionName("OpisenseSourceCreated")]
public static async Task<IActionResult> Run([HttpTrigger(AuthorizationLevel.Function, "post", Route = null)]HttpRequest req, TraceWriter log)
{
    return new OkObjectResult($"Hello World");
}
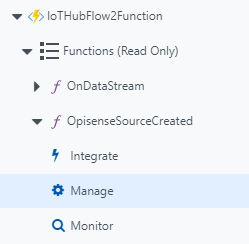
Once published go to the manage tab in the Azure Portal:
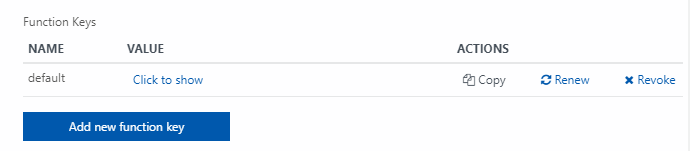
Then grab the Function Key (or create a new one) by clicking on the copy link:
Now click on the main function tab
And grab the function url

If you then send an HTTP Post to this URL, you'll get the reply as follow:
Hello World
2. Create an Opinum Webhook
From the settings of your Opinum Account (Manager Account Required) you can create webhooks (See Documentation for more details)
Give it a name of your choice and make sure you select "Source Create" as an Event Type. Paste the function URL in the URL field. Leave the Authentication to None as the Function Key is within the URL.
Leave the Custom Headers empty and choose the JSON Format.
In the body you should use the following:
{{ json Source }}
By adding "json" before the Source keyword, you're telling Opinum to dump the whole source object in JSON format.
At the bottom of the popup, hit test to make sure everything is properly setup. After a few seconds, you should see the return value of the function. This confirms that everything is working. Save the configuration.
If you want to be completely sure that everything works fine, you can go ahead and create a new source. When you come back to the webhook page, the table of webhooks should contain a new history item for your webhook.
3. Creating the Azure IoT Device
Go back to the code of your function and change the body with the following:
static RegistryManager registryManager;
static readonly string connString = Environment.GetEnvironmentVariable("AzureIotHub", EnvironmentVariableTarget.Process);

[FunctionName("OpisenseSourceCreated")]
public static async Task<IActionResult> Run([HttpTrigger(AuthorizationLevel.Function, "post", Route = null)]HttpRequest req, TraceWriter log)
{
    string requestBody = new StreamReader(req.Body).ReadToEnd();
    dynamic source = JsonConvert.DeserializeObject(requestBody);

    registryManager = RegistryManager.CreateFromConnectionString(connString);

    log.Info("Creating device");

    var primaryKey = await CreateDeviceIdentity(source.MeterNumber, log);

    return new OkObjectResult($"Device {source.MeterNumber} created.");
}
You also have to add the following method:
private static async Task<string> CreateDeviceIdentity(string deviceId, TraceWriter log)
{
    Device device = new Device(deviceId);
    Device newdevice = new Device();

    string token = string.Empty;

    var primaryKey = Guid.NewGuid();
    var secondaryKey = Guid.NewGuid();

    byte[] bytes = Encoding.UTF8.GetBytes(primaryKey.ToString());
    string base64PrimaryKey = Convert.ToBase64String(bytes);

    bytes = Encoding.UTF8.GetBytes(secondaryKey.ToString());
    string base64SecondaryKey = Convert.ToBase64String(bytes);

    try
    {
        device.Authentication = new AuthenticationMechanism
        {
            SymmetricKey = new SymmetricKey
            {
                PrimaryKey = base64PrimaryKey,
                SecondaryKey = base64SecondaryKey
            }
        };

        newdevice = await registryManager.AddDeviceAsync(device);
    }
    catch (Exception e)
    {
        log.Error(e.Message, e);
    }

    token = newdevice.Authentication.SymmetricKey.PrimaryKey;
    return token;
}
At this point, you function is using the RegistryManager (nuget: Microsoft.Azure.Devices) to create a new Device in your Azure IoT Hub. Please note that in this case we are using the Meter Number property of a Source as the device Id in Azure IoT Hub.
As you can see, it also create an authentication key for the device. To find it you'll have to go to the Azure Portal. However, you could also send that information back to Opinum Data Hub.
To do so, add the following lines to the Run function right before the return line:
var patchDocument = new JsonPatchDocument();
patchDocument.Add("/clientData/IoT Hub Info/Security/Primary Key", primaryKey);

log.Info("Patching Source");
await OpisenseClient.PatchOpisenseSource(id.Value, patchDocument);
This small piece of code uses the nuget package Microsoft.AspNetCore.JsonPatch in order to create a Patch Document. PATCH is an HTTP Verb used to create partial updates to a resource. More information on this website.
In this particular case, we are updating the value of a custom Form to set the primary key in Opinum. You will have to either create the corresponding Form or to adapt this piece of code to match your own form.
The OpisenseClient object is a helper Library that you will be able to install using our nuget package Opisense.IoT.Common. More info here.
4. Final Test
You should now go back to Opinum Data Hub and create a new Source.
After a short time, you should see:
- A new item popping up in the history of the webhook.
- The Primary Key being filled in from the Azure Functions.
Note that for the Data Ingestion step, you also have to create variables for you Sources. For the purpose of this documentation, here is the configuration you should use for the 2 variables to create:
Temperature Variable
- Name: Temperature
- Unit: Celcius Degree (id: 28)
- Granularity: 15 - Minutes
- Quantity Type: Instantaneous
- Mapping Config: temperature
Humidity Variable
- Name: Humidity
- Unit: Percentage (id: 31)
- Granularity: 15 - Minutes
- Quantity Type: Instantaneous
- Mapping Config: humidity
The casing on the Mapping Config is very important as it will be used as a key to properly identify the variable to use.
Your next step is to configure Data Ingestion
Use Case 2: Devices created from Azure IoT Hub
This use case is based on the assumption that Opinum Data Hub should "replicate" Azure IoT Hub's Device configuration. In other words, when a device is created in Azure IoT Hub, a new source should be created in Opinum Data Hub.
For this step you'll need the following:
- An Azure IoT Hub Instance
- An Event Hub Namespace
- An Azure Function App
- An Opinum Account
1. Setup the Event Hub Namespace
If you are familiar with Azure Event Hubs, this step is relatively easy. the only thing you need is an actual Event Hub ready for event ingestion.
you can find more information on how to create an Event Hub in the Azure Event Hub Documentation.
Once the Event Hub has been created, you're going to need the connection string in the next steps.
2. Setup Azure IoT Hub Event Subscription
In you Azure IoT Hub instance, you should navigate to the event page.

Click on the Add Event Subscription button and enter the following informations:
- For the event types, uncheck the "Subscribe to all event types" checkbox and select Device Created. Note that you can perfectly leave all events but that will create more traffic to you event hub and to the Azure Function and therefore, impact the pricing.
- On the Endpoint Details, select Event Hubs, then select your freshly created Event Hub.
- Give a name to the Event Subscription. The name does not really matter.
- For the Event Schema, select Event Grid Schema. More information on the Event Grid Schema Documentation
3. Setup the Azure Function
For this use case, we are going to need an Event Hub triggered Azure Function. You are going to need the Microsoft.Azure.WebJobs.Extensions.EventHubs nuget package.
The code is then as follow:
[FunctionName("OnCreateOrDeleteDevice")]
public static async Task RunCreateDeleteDevice([EventHubTrigger("createdelete", Connection = "CreateDeleteEventHub")]
    EventData[] messages, TraceWriter log)
{
    foreach (var message in messages.Deserialize<dynamic>())
    {
        if (message.eventType == "Microsoft.Devices.DeviceCreated")
        {
            var sourceId = await OpisenseClient.CreateOpisenseSource(new
            {
                siteId = DefaultSiteIdForNewSources,
                meterNumber = message.data.twin.deviceId,
                energyTypeId = 17,
                name = message.data.twin.deviceId,
                sourceTypeId = 72,
                timeZoneId = "UTC"
            }, new List<object>
            {
                new
                {
                    name = "Temperature",
                    unitId = 28, // Celcius Degrees
                    granularity = 15,
                    granularityTimeBase = "Minute",
                    quantityType = "Instantaneous",
                    mappingConfig = "temperature"
                },
                new
                {
                    name = "Humidity",
                    unitId = 31, // Percentages
                    granularity = 15,
                    granularityTimeBase = "Minute",
                    quantityType = "Instantaneous",
                    mappingConfig = "humidity"
                }
            });
            log.Info($"Successfuly created source<{sourceId}>");
        }
    }
}
In this case we chose to create a simple source in Opinum Data Hub that contains 2 variables for Temperature and Humidity. The idea is that you create the source you need based on your project.
Notes:
- The
EventHubTriggerin the function parameters has 2 parameters. the first one is the name of the Event Hub and the second one is the name of the setting that contains the Connection String to the Event Hub Namespace. - The first parameter of the function is an array of
EventData. This tells the function that it is allowed to take multiple messages in the Event Hub upon triggering. You can simplify the code by not allowing an array but the pricing of Azure Functions is partially based on the amount of execution so it might be beneficial to use the array. - We are using a constant for
DefaultSiteIdForNewSourcesto simplify the code. - The
mappingConfigfield in the variable is important, it will be used later on in the Data Ingestion step.
The OpisenseClient object is a helper Library that you will be able to install using our nuget package Opisense.IoT.Common. More info here.
4. Final Test
You can now create a device in you Azure IoT Hub instance and see that a new Source is properly created in Opinum Data Hub.
Your next step is to configure Data Ingestion
Data Ingestion in Opinum Data Hub
There are many different ways to feed Opinum with Data. The chosen approach for this documentation is to call an HTTP endpoint.
1. Prepare your Opinum user
You are going to give a special permission to your user so it is allowed to push data to the Standard Push API Endpoint.
Go to the Users Page in Opinum Data Hub and find the user that will be responsible for sending the data.
In the configuration page of the user, add the DataPusher role. A new table should appear below the Roles tables. This table shows you all the different endpoints on which you are allowed to push data. In that one, you should select "Standard".
2. Setup Azure Event Hub
If you are familiar with Azure Event Hubs, this step is relatively easy. The only thing you need is an actual Event Hub ready for event ingestion.
you can find more information on how to create an Event Hub in the Azure Event Hub Documentation.
If you've followed the Use Case 2, you can perfectly reuse the Event Hub Namespace. However you still have to create a new Event Hub.
Once the Event Hub has been created, you're going to need the connection string in the next steps.
3. Setup Azure IoT Hub Endpoint and Route
Azure IoT Hub Endpoints are a simple way to connect IoT Events to other Azure Services. For this documentation we will use Azure Event Hubs.
In the Azure IoT Hub page, go to the Endpoint Menu and create a new Endpoint.
Select the Event Hub you created in the previous step.
For more information on Azure IoT Hub Endpoints, refer to the documentation.
The Route feature of Azure IoT Hub gives you the ability to route messages to different Endpoints based on the content.
For this route, you need the following parameters:
- Name: Whatever suits you, it does not really matter.
- Data source: Device Messages.
- Endpoint: The endpoint you created juste before.
- Enable Rule: ON
- Query String: true
The query string used here says that all Device Messages will be routed to the selected Endpoint. More info on the Routing Syntax Documentation.
4. Setup the Azure Function for Data streaming
No matter which Use Case you have selected above, you should already have a Function project. In this step you will have to add a new Function.
Here is the code of the new Function:
[FunctionName("OnDataStream")]
public static async Task RunDataStream([EventHubTrigger("datastream", Connection = "CreateDeleteEventHub")]
    EventData[] messages, TraceWriter log)
{
    var data = new List<OpisenseData>();
    foreach (var eventData in messages)
    {
        var message =
            JsonConvert.DeserializeObject<SimulatorMessage>(Encoding.UTF8.GetString(eventData.Body.Array));

        data.Add(new OpisenseData
        {
            MeterNumber = message.DeviceId,
            MappingConfig = "Temperature",
            Data = new List<OpisenseDataPoint>
            {
                new OpisenseDataPoint
                {
                    Date = eventData.SystemProperties.EnqueuedTimeUtc,
                    Value = message.Temperature
                }
            }
        });
        data.Add(new OpisenseData
        {
            MeterNumber = message.DeviceId,
            MappingConfig = "Humidity",
            Data = new List<OpisenseDataPoint>
            {
                new OpisenseDataPoint
                {
                    Date = eventData.SystemProperties.EnqueuedTimeUtc,
                    Value = message.Humidity
                }
            }
        });
    }

    await OpisenseClient.SendData(data.Merge());
}
As you can see the code is using SimulatorMessage. Here is the code:
public class SimulatorMessage
{
    public string MessageId { get; set; }
    public string DeviceId { get; set; }
    public double Temperature { get; set; }
    public double Humidity { get; set; }
}
Notes:
- The
EventHubTriggerin the function parameters has 2 parameters. the first one is the name of the Event Hub and the second one is the name of the setting that contains the Connection String to the Event Hub Namespace. - The first parameter of the function is an array of
EventData. This tells the function that it is allowed to take multiple messages in the Event Hub upon triggering. You can simplify the code by not allowing an array but the pricing of Azure Functions is partially based on the amount of execution so it might be beneficial to use the array.
The code does a simple mapping between the device message (SimulatorData) and the Opisense Data Format (OpisenseData) for all the messages in the EventData array.
Before sending the data to Opinum used the merge method. This is not completely necessary but slightly improves the size of the payload sent to Opinum, making the transaction slightly faster.
5. Setup a Device for testing
This time, to be able to test the flow, you're going to need device. However, Microsoft has plenty of samples in many different languages for Simulated Devices. In this case we are using the dotnet simulated device client sample.
Before launching the application, make sure you've modify the following lines:
private const string IotHubUri = "{iot hub hostname}";
private const string DeviceKey = "{device key}";
private const string DeviceId = "myFirstDevice";
After a short period of time, you should see the available data in your Opinum Account.
Resources
Github to be provided ASAP
Opisense.IoT.Common
Opisense.IoT.Common is our Nuget package containing the helper classes that you will need to interact with the Opinum API to manipulate Opinum Objects (Sites, Sources, Variables, ...) and send data to the Standard push endpoint.